Input/output
In this section we remind the formats readable by GraphiteLifeExplorer. We also show how to save a scene made with GraphiteLifeExplorer so that it can be opened in high-end 3D packages
PDB export
Here is shown how to export a component of a scene (protein and DNA) into the Protein Data Bank file format
Objective: This tutorial shows how to find a scene created with GraphiteLifeExplorer again in another 3D modeling tool able to read the PDB file format. This is useful when you wish to use the capabilities of various software.
Note that each component of a scene is to be saved into the PDB format and open one by one in the target software.
0/ We are going to create a simple scene made of two experimental structures and one DNA molecule modeled with GraphiteLifeExplorer.
1/ From the File menu, Load two PDB files. In the scene shown in the image below, the structures corresponding to PDB 1AZO and PDB 1RSB have been loaded and displayed as cloud representation:

2/ Create a DNA molecule (see tutorials about DNA modeling) as shown in the image below:

3/ Select 1RSB in the outliner, go to the “tool” tab, click on the “curved arrow” icon and move and rotate the structure as shown below. Do likewise with 1AZO:

Note from the image above that an icon situated in the lower left corner of the screen recalls the mode (modeling, translation/rotation or camera) you are in.
4/ We wish to load this scene in another 3D tool with the components exactly in this configuration, in other words without any modification of their position and orientation. Select 1RSB in the outliner, go to the “GraphiteLifeExplorer” window, click on “Write PDB”, select a location from the popup window, give a name like 1RSBv2.pdb (“v2” to distinguish the new file from the initial file), do not forget to add the extension .pdb, and press Open (a “Save” button should have been better, the modification is on the todo list):

You can check that the file has been correctly written by loading it in the scene.
5/ Do likewise with 1AZO and name the file 1AZOv2.pdb.
6/ Let’s save the DNA structure in the PDB format. Check DNA in the outliner, go to the menu “Curve”, click on “export DNA as PDB”, a popup window opens, click on the icon looking like a folder in the upper right corner of this window, type DNA.pdb in the box “File name (do not forget the extension!), press open (the “Open” window disappears), check “Prefix nuc name with D”, and press OK in the remaining window:

Remind that the DNA molecule must be displayed in the atomic representation to be exportable in the PDB file format!
The image below shows the components loaded in UCSF Chimera:

Note that you can import the PDB files in Blender thanks to the ePMV plugin or BioBlender. Use Molecular Maya to import PDB files in Maya.
Import/export in 3D file formats
3D file formats that can be imported are indicated. This tutorial also shows how to export a surface model in VRML
Import
GraphiteLifeExplorer can read the following 3D file formats: OBJ, PLY (useful for 3D printing), 3DS, Lightwave LWO
Export
GraphiteLifeExplorer can export in VRML. The X3D export is currently facing problems (we are working on it, the next release will permit the X3D export).
Note that tools exist capable of converting any VRML file into other 3D file formats like 3DS, X3D (and then in HTML5), PLY,…
Hereafter is shown how to export a surfacic model (protein or DNA) in the VRML file format:
1/ Go to File \ Load and choose a PDB file
2/ Give a surface appearance with 2 colors like in the image below:

3/ Go to Mesh \ Global and select “invert normals”
4/ Go to the LifeExplorer menu and click on “fix position” (see explanations here).
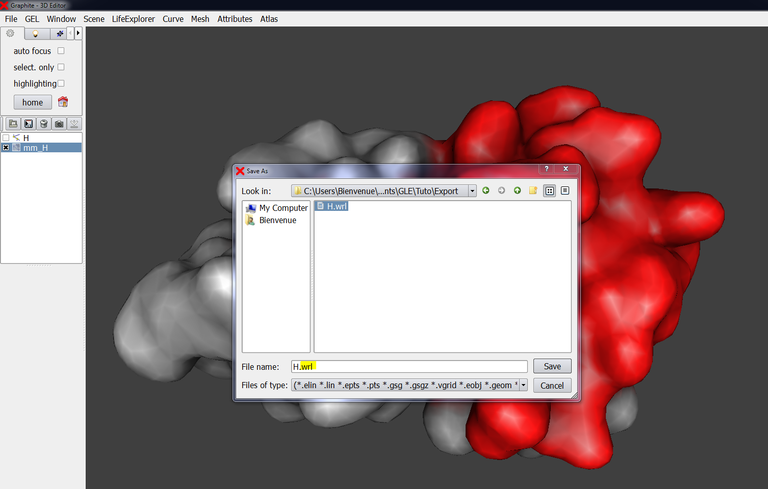
5/ Select the surface in the outliner, go to File and “save current”: give a name to the object and add the extension .wrl:
Important notice 1:
GraphiteLifeExplorer does not add the normals in the VRML text file. Therefore, your object will look like faceted when opened in a 3D modeling software like Blender or 3DS Max:

This is not a real problem as many 3D software have algorithms allowing to give the surface a smooth appearance without adding any supplemental triangle! In MeshLab (an interesting open source software able to import and export in various 3D formats), the button “Smooth” does this job:

Blender or 3DS Max use smoothing groups to give the illusion of a nice and smooth surface (see here).
Important notice 2:
At step 4, it is required to apply “fix position”. Let’s explain this point. Let’s imagine that you are working on the polysome model shown below, in which each ribosome (displayed under the form of a surface) is characterized by a position and an orientation within the complex. Whatever you plan or not to export the model in order to use it in another 3D software, click on “fix position” each time you move a surface to shape the model. Otherwise you will loose the position and the orientation of the surface within the arrangement when you save: all ribosomes will be superimposed at the opening in the target software. This is a developer choice aiming at offering real-time modeling.
