Basics
Here we show how to perform specific tasks (making copies of objects, grouping objects, calculating distances…).
-
How to save?
-
How to duplicate an object?
-
How to group several surfaces?
-
How to identify the 5′ and 3′ extremities?
-
How to know the length of a DNA model
-
How to fix the length of a DNA model
-
How to calculate the distance between pairs of residues
-
Additional files
How to save?
This tutorial explains the ways to save a scene.
Let’s consider a scene like the one below. This scene is made of:
- two nucleosomal particles where atoms are displayed as spheres
- various isosurfaces
- and a DNA duplex

This scene can be saved this way:
1/ Go to File\Save scene and give the scene a name like nucleosomes.gsg. Do not forget the “gsg” extension (for Graphite Scene Graph). This way of saving guarantees you that the DNA and the surface are saved (in their current position and orientation) and thus can be called back later when the scene is re-opened. HOWEVER the connection with the PDB files is lost: when you re-open the scene you will not be able to perform any task (like creating surfaces) on the atomic structures initially opened from a PDB file. These structures are still displayed in a blue color (with spheres representing atoms) but they have disappeared from the GraphiteLifeExplorer window:

2/ To be able to work on the scene as it was before closing the tool, you must save the 3D structures (initially opened from PDB files) in the PDB file format or, in other words, re-write their PDB file. This function “Write PDB” is described here. This way to proceed guarantees that the structures are positionned and orientated exactly as they were before closing the tool. Obviously, if you do not move a structure (loaded from a PDB file) it is not necessary to save it in the PDB file format.
As a conclusion, saving a scene requires:
1/ to save the scene in the gsg format (from File\Save scene)
and
2/ to save each component (initially opened from a PDB file) in the PDB file format to keep their orientation and position.
How to duplicate an object?
This short tutorial shows the steps to get two copies or more of the same mesh. (by D. Larivière, Fourmentin-Guilbert Foundation and S. Hornus, INRIA-LORIA)
We are going first to create a surface from a PDB file, and then see how to duplicate this surface in the 3D scene.
1/ Launch Graphite-LifeExplorer
2/ From the Graphite-LifeExplorer window click on Load PDB and select in your computer the PDB file of your choice:
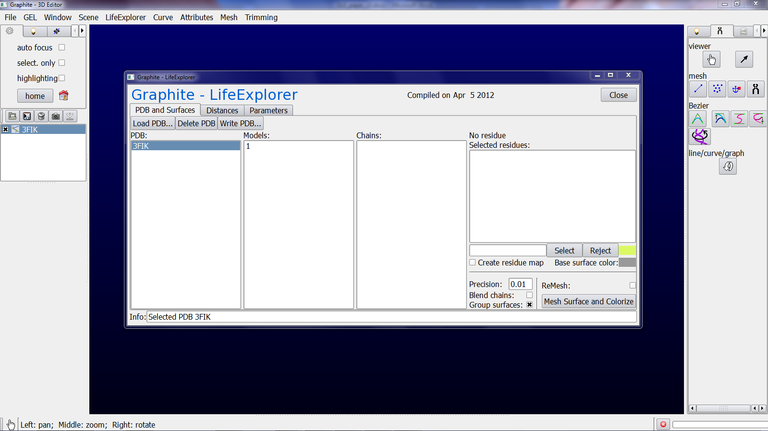
3/ Click on Mesh Surface and Colorize. Here we have selected 3FIK corresponding to the ribosomal 50S subunit. Due to its huge size (~ 80,000 atoms), we set the “Mesher’s distance bound in Angstrom” in the Parameter tab at 1.0 and we set the Precision at 0.3 in the PDB and Surfaces tab. This way a rather detailed surface will be computed fastly. Also, we check “Blend chains” in order not to see the interface between the chains, and we check Group surfaces (otherwise a surface per chain will be created in the outliner, 32 in total for the 50S subunit!!!):


Now we are going to see how to make a copy of this surface:
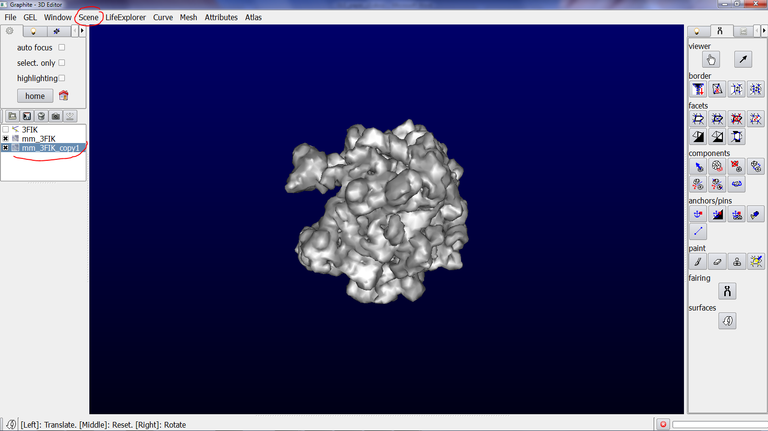
4/ Make sure that the surface is selected (highlighted in blue) in the outliner, as shown in the image above.
5/ Go to the Scene tab, and click on “duplicate current”. An object name “mm_3FIK_copy1” is created:
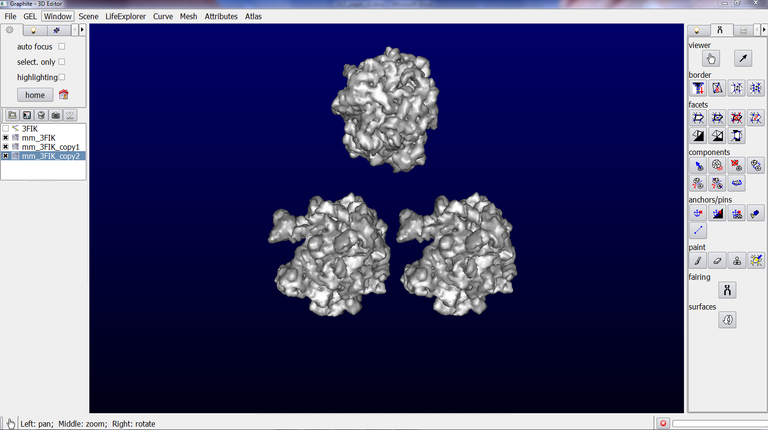
6/ Make sure that the duplicated object is highlighted in blue in the outliner. Go to the Tool tab in the left panel and click on the Arrow icon (a tool to rotate and translate object):

7/ Go back to the scene, and drag the object with the Left Mouse Button (LMB). The duplicated object is translated. You can also rotate it with the Right Mouse Button:

Note that you can rename each object present in the outliner from the Scene tab / Rename Current.
How to group several surfaces?
Here is shown the steps to combine several surfaces into a single surface
(by D. Larivière, Fourmentin-Guilbert Foundation and S. Hornus, INRIA-LORIA)
PDB files needed: 3FIK, 3FIH
This tutorial shows how to combine several surfaces in order to move and rotate them like a single object. This is useful in many situations, in particular when one wishes to model an arrangement of several ribosomes (see image below). Each ribosome can be thus moved as a single object (although it is made of two subunits that can not be combined into one single PDB file, which implies to deal with two surfaces).
Do not be scared by the length of this tutorial focusing only on one function: We detail everything, plus we start by creating surfaces.
We are going first to create a surfacic appearance for the two subunits of a ribosome and then we will combine both surfaces.

1/ Launch Graphite-LifeExplorer
Surface creation:
2/ From the Graphite-LifeExplorer window click on Load PDB and select the PDB file 3FIK in your computer. Do the same for 3FIH:


We are now going to create a surface appearance for both subunits. The quality of the surface (in fact the level of the details at the surface) is not really important here but we nevertheless wish to highlight the peptide tunnel exit at the 50S subunit surface: Residues 93, 481, 1136 of chain B and 51, 58 of chain U shown in another color delineate the tunnel exit:
3/ Select 3FIK in the Graphite-LifeExplorer window (corresponding to the ribosomal 50S subunit). Due to its huge size (~ 80,000 atoms), we set the “Mesher’s distance bound in Angstrom” in the Parameter tab at 1.0 and we set the Precision at 0.3 in the PDB and Surfaces tab. This way a rather detailed albeit coarse surface will be computed fastly. Also, we check “Blend chains” in order not to see the interface between the chains, and we check Group surfaces (otherwise a surface per chain will be created in the outliner, 32 in total for the 50S subunit!):


4/ At step 3 we have set up the quality of the surface. Now we are going to set up the information to highlight at the surface. Make sure that 3FIK is selected in the Graphite-LifeExplorer window. Select Model 1 and chain B, and type 93,481,1136 in the text box as shown below, select the red color for this selection…

… and press Select.
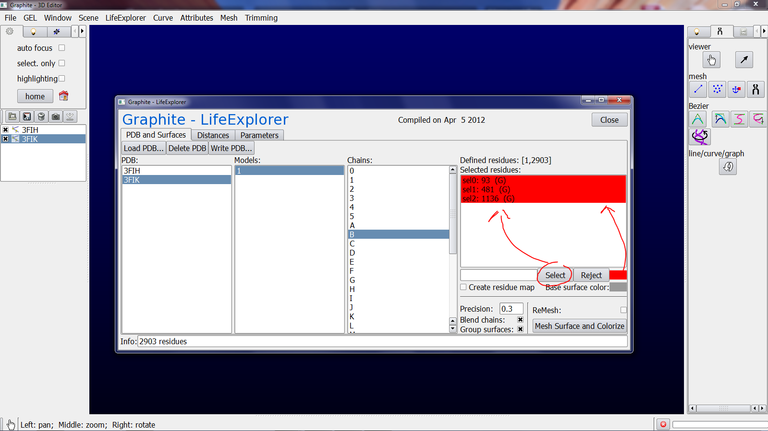
Do the same for residues 51 and 58 of chain U.
Click on 3FIK (this way the name of the surface will be mm_3FIK instead of mm_3FIK.1.B):

Press Mesh Surface and Colorize. The surface creation process takes some time for such a big structure:

Click somewhere in the scene, then click on Home to center the content of the scene:

Use the Right Mouse Button to turn around the structure and see the residues in red at the surface. This is where the tunnel exit is:

Note that the triangles forming the surface are visible. This is not important if the camera is at a certain distance. If the level of details of the surface is enough but you wish a smooth surface, select mm_3FIK in the outliner, go to the Mesh tab, then Global, Split, select C_loop and press OK, the surface is smoothed. Note that the number of triangles has increased: The surface is beautiful but the real-time navigation is affected.
5/ Repeat step 4 in order to create a surfacic appearance for the 30S subunit. Note that there is no residue in particular to select. Also, change the base surface color to visually differentiate the two surfaces:


Click somewhere in the scene. Click on the Hand icon (to turn to the Camera mode), zoom off (Mouse wheel) and turn around the object (Right Mouse Button) to get the view hereafter.
Note that if you forget to click on the Hand icon, rolling the mouse wheel will have no effect but the Right Mouse Button will rotate the surface selected in the outliner. If this happens, although no Undo function exists, click on (not roll) the surface moved by error with the mouse wheel, and the surface position/orientation is reset.

The surfaces of the two subunits have thus been created.
6/ Click on 3FIK in the outliner and then on the Arrow icon in the tool tab, drag the surface with the Left Mouse Button, you observe that the surfaces are independent…

Yet you want to move the two surfaces like a single surface. Click on (not roll) the surface (translated for the example) with the wheel mouse button to reset its position and orientation.
7/ In the outliner, click on mm_3FIK, go to the LifeExplorer tab and select Fix position. Do the same for mm_3FIH.
8/ Then, go to the Mesh tab, select components and gather components. In the name text box type the name of the new surface combining mm_3FIH and mm_3FIK like this: mm_70S
Uncheck delete components, check copy attributes. This is shown below:
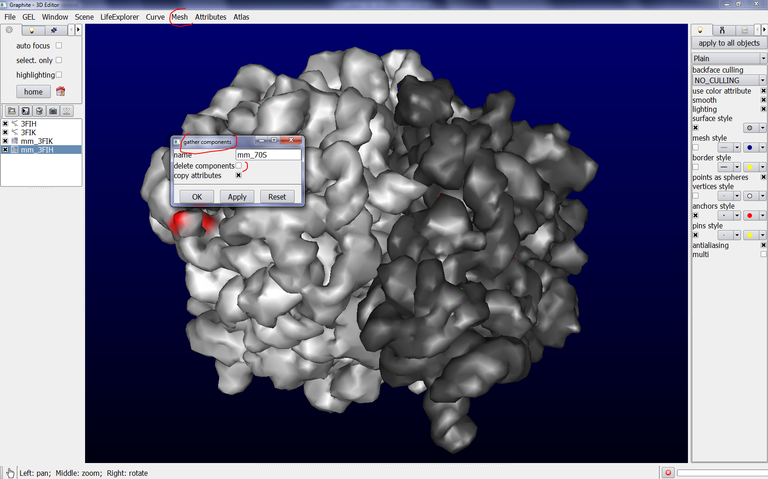
and press OK. You observe that a new object named mm_70S is created in the outliner. Note that mm_70S replaces the object previously selected in the outliner, mm_3FIH. This is not a bug but should be corrected in a short future (Anyway mm_3FIK is not lost since the function dispatch components in Mesh / Components recreates and differentiates both objects):

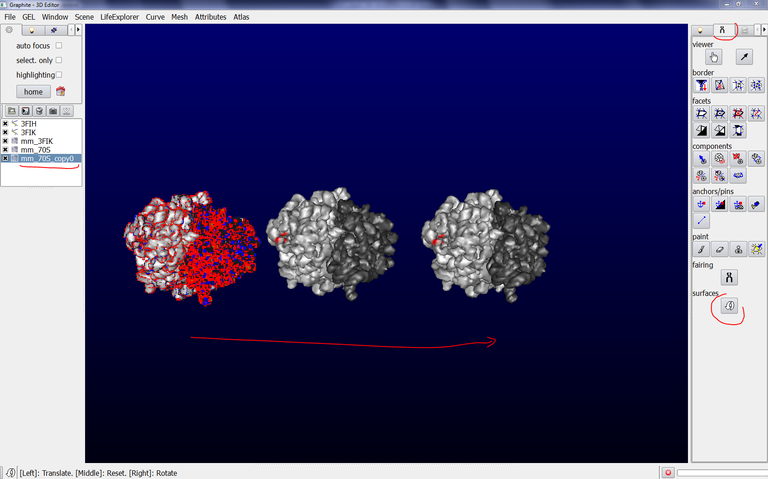
9/ Make sure that mm_70S is highlighted in blue in the outliner, click on the Arrow icon in the tool tab, drag the surface with the Left Mouse Button, you observe that both surfaces behave like a single one:

10/ Make sure that mm_70S is highlighted in blue in the outliner, go to the Scene tab, select duplicate current, drag the surface with the Left Mouse Button, you observe that another ribosome surface has been created (its name mm_70S_copy0 is a little bit long but you can change it in the Scene tab, rename current):
Note that these new surfaces are now independent of the underlying PDB file. So changing the surface color from the Graphite-LifeExplorer does not modifiy their own colors.
Important notice: Graphite-LifeExplorer is a plugin for a software named Graphite. Graphite is dedicated to one single mesh processing. It is progressively adapted for managing several and even numerous meshes in the scene, not only one. For this reason, the function Gather components combine all surfaces present in the scene into one single object. So combining 2 surfaces and then 3 others is not possible to date. If it is necessary, create each combined surface before the final scene, save it in the gsg format through File Save current, and load them in the final model when needed. This will be corrected in the future.
How to identify the 5′ and 3′ extremities?
This short tutorial shows how to find the 5′-3′ sense.
When modeling DNA with GraphiteLifeExplorer, it is necessary to be able to identify quickly and easily the polarization of a strand. As example, knowing where is the 5′ or 3′ extremity is of importance when one connects a modeled DNA molecule to the DNA molecule contained in an experimental structure (see the tutorial Connecting modeled DNA to experimental DNA).
1/ Create a DNA molecule with GraphiteLifeExplorer
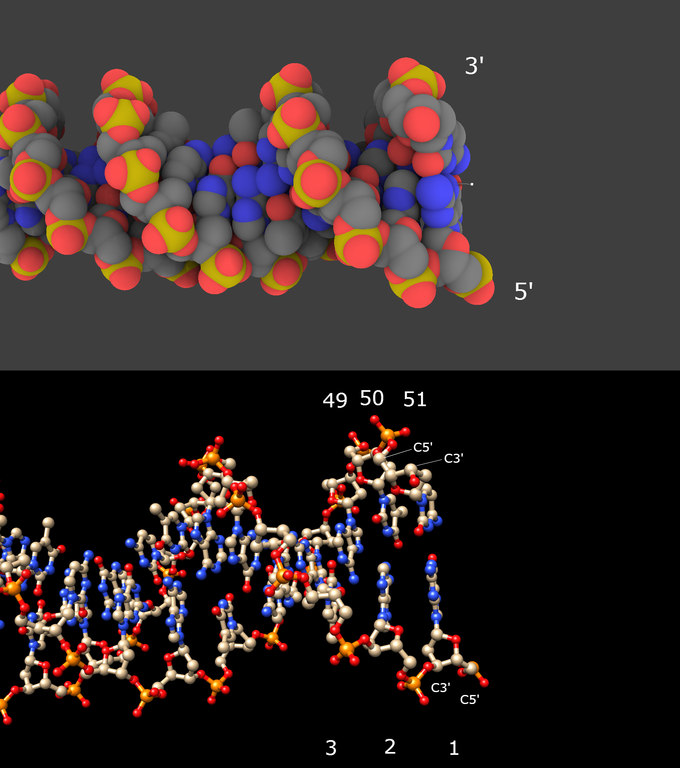
2/ Look at one end of the molecule (upper image below):
The strand for which the last phosphorus atom (in yellow) looks like “out” is polarized 5′ to 3′. The strand for which the last phosphorus atom looks like “in ” is polarized 3′ to 5′. This is a visual mean!
The demonstration comes up from the lower image showing the DNA molecule visualized in Chimera: locate the C5′ atom, then the C3′ atom in the same sugar: here is the sense! Note that the residue numbers always increase from 5′ to 3′.
How to know the length of a DNA model?
Here is shown how to display the size of a modeled DNA
Once a DNA model has been created, select it in the outliner, go to the Curve menu, and select Curve length. The length is indicated at the bottom of the main window. It is expressed in “point samples”: “270 point samples” like in the image below means 270 base pairs.
Important notice: The atomic representation is necessary to display the number of base pairs.

How to fix the length of a DNA model?
Here is shown how to limit the length of a DNA duplex while modeling it
Fixing the length of a DNA molecule can be useful in various modeling situations. How to do so?
Important notice: if the DNA length is fixed to 60 base pairs, therefore 60 bp will be exported in the PDB file format.
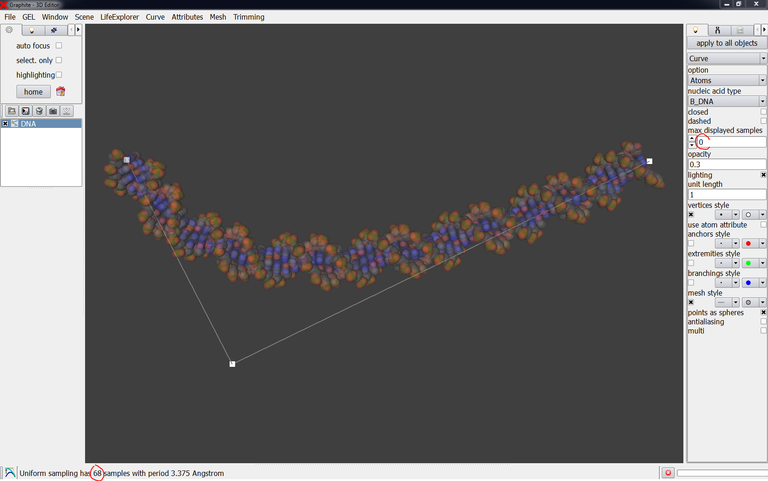
1/ Create a DNA model like in the image below. Display its length.

2/ This DNA molecule is 30 bp long. We can fix the length at 30 bp. Go to the Light tab, and type 30 in “max displayed samples”:

3/ Now if you extend the DNA molecule by moving the last control point, you notice that the number of displayed base pairs is kept constant (even if the length is updated at the bottom of the main window, here 62):

The length is kept fixed when you change the shape:

If you type 0 instead of 30 in “max displayed samples” the DNA will be displayed in full length (68 bp in this case):
Important notice: if the number of bp is fixed to 60, therefore 60 bp are exported in the PDB file format.
How to calculate the distance between pairs of residues?
This folder contains a written tutorial as well as an easily editable python script useful to perform numerous distance calculations and to save the list.
Written tutorial
We first show how to calculate distances manually from the user interface. Then, we indicate how to edit a simple text file that can be read by GraphiteLifeExplorer to calculate distances in an automated manner.
Important notices:
- The distance calculated by GraphiteLifeExplorer is the shortest euclidean distance between two residues. It is not possible yet to choose a specific atom within the residues of interest.
- Distances can be calculated between two residues belonging to the same component or to two different components imported from a PDB file.
- Distances can only be measured for component(s) imported from a PDB file. Therefore a DNA molecule in the course of modeling with the Bezier tools can not be taken into account. To overcome this limitation (that will be overcome in the future) save your DNA molecule in the PDB file format, load the PDB file and calculate distances.
First method
1/ From the Protein Data Bank download the structures corresponding to 1CYO and 1D86.
2/ From GraphiteLifeExplorer, go to the File menu, load first 1CYO and then 1D86 (Note: the order has no importance, just do not load the two files simultaneously. They would be displayed in the 3D view but not in the GraphiteLifeExplorer window from which surface rendering and distance measurements are carried out. This bug will be corrected).
3/ Facultative: Both components superimpose in the 3D view. Select 1D86 from the outliner, go to the tool tab (the clamp-like icon), click on the curved arrow at the bottom, then move the component corresponding to 1D86 with the Left Mouse Button to disjoin 1D86 from 1CYO.
4/ Go to the GraphiteLifeExplorer window. Click on the “Distances” tab:

5/ Select 1CYO1.A (meaning 1CYO – Model 1 – chain A) in the column Residue 1, and type a residue number, say 20. Select 1CYO1.A in the second column and type 65. Then press “Add pair”: 1CYO.1.A.20 <—> 1CYO.1.A.65 appears in the right panel. Press Recompute distance to get the distance value. Select “1CYO.1.A.20 <—> 1CYO.1.A.65 = 23.1972 Angstrom.” in the right panel and press Removed selected pair if you wish to delete it.
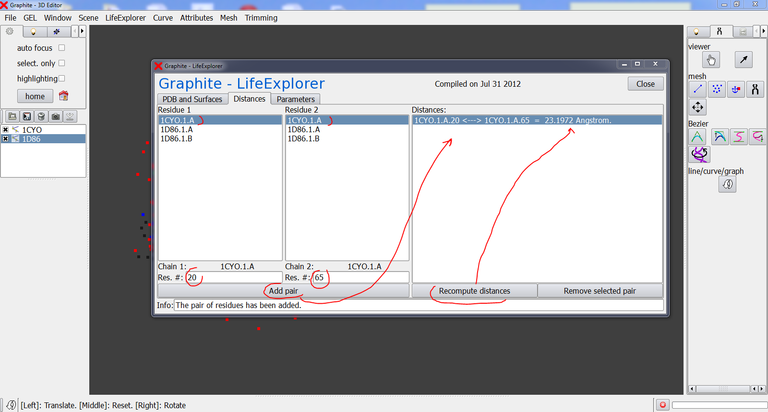
6/ Select 1D86.1.B in the column Residue 1, type residue number 15. Select 1D86.1.A in the column Residue 2, type residue number 1. Press “Add pair”, select “1D86.1.B.15 <—> 1D86.1.A.1” in the right panel and then “Recompute distance”.

You can this way calculate as many distances as you wish.
Second method: Automated manner
1/ Notice: Replace first the original file micomegas.gel in \lib\plugins\OGF\MicroMegas by the file micomegas.gel found in the folder Additional files.
2/ The previous list containing two distances can not be saved and the list is lost once you close the software. Keeping intact a list of distances can be useful in various situations where a long list of distances is to be processed in a recurrent manner.
As long as there is no “Save list” button (future improvement), the way to handle this limitation is to edit a text file named distances.gel that has the following simple Python structure:
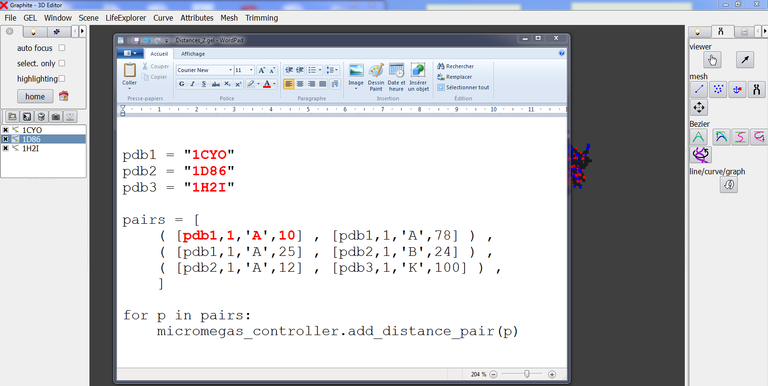
In front of pdb1, pdb2, pdb 3, etc, you type the name of the component involved in the distance calculation, exactly as it is typed in the outliner of GraphiteLifeExplorer.
In the example above 3 measurements are listed where for instance
( [pdb2,1,’A’,12] , [pdb3,1,’K’,100] ) specifies the distance between residue 12 of chain A of model 1 of pdb2 (=1D86) and residue 100 of chain K of model 1 of pdb3 (= 1H2I).
3/ Once the file is edited and saved, go to the menu GEL, choose “execute file”, choose distance.gel and press Open. The 3 distances are automatically inserted in the right panel of the GraphiteLifeExplorer window. Press Recompute distances to calculate the distance values:

Additional files
This folder contains two files: distance.gel and micromegas.gel
- distance.gel
- A Python script to calculate distances in an automated manner
- pdb1 = “1CYO”
pdb2 = “1D86”
pdb3 = “1H2I”pairs = [
( [pdb1,1,’A’,10] , [pdb1,1,’A’,78] ) ,
( [pdb1,1,’A’,25] , [pdb2,1,’B’,24] ) ,
( [pdb2,1,’A’,12] , [pdb3,1,’K’,100] ) ,
]for p in pairs:
micromegas_controller.add_distance_pair(p)
- micromegas.gel
- This file replaces the original file located in \lib\plugins\OGF\MicroMegas
# BIO SYSTEM
import os.path, sys
# – – – – – – – – – – – – – – – – – – – – – – – – – – – – – – – – – – – – – – –
# B U N C H
# – – – – – – – – – – – – – – – – – – – – – – – – – – – – – – – – – – – – – – –
class Bunch(object):
def __init__(self, **kwds):
self.__dict__.update(kwds)
def __eq__(self, other):
if type(other) != type(self):
return False
return self.__dict__ == other.__dict__
# – – – – – – – – – – – – – – – – – – – – – – – – – – – – – – – – – – – – – – –
# B I O S Y S T E M
# – – – – – – – – – – – – – – – – – – – – – – – – – – – – – – – – – – – – – – –
class BioSystem:
“Loads a PDB and give access to it. Future: load other file formats?”
def __init__(self, filename):
if not filename.endswith(‘.pdb’) and not filename.endswith(‘.pdb1’):
raise Exception(“File is not a PDB”)
# dictionary : PDB record name (6 chars) -> list of records in the file (in order)
self.pdb_records = {}
self.models = {}
self.load_pdb(open(filename))
self.find_chains() # find models and their chains
self.setup_residue_data_for_chains()
# Find PDB entry name:
n, e = os.path.splitext(os.path.basename(filename))
self.filename = filename
self.name = n
# cleanup useless PDB entries
useful_records = [‘NUMMDL’] #[‘COMPND’, ‘NUMMDL’, ‘SEQRES’]
for key in list(self.pdb_records.keys()):
if not key in useful_records:
del self.pdb_records[key]
# cleanup atoms
for m in self.models.values():
m.pdb_atoms = []
def init_model(self, m):
model = Bunch()
model.num = m
model.pdb_atoms = []
model.chains = {}
self.models[m] = model
def load_pdb(self, in_file):
model_number = 1
self.init_model(1)
for line in in_file.readlines():
key = line[0:6].strip()
if key == ‘MODEL’:
model_number = int(line[10:14])
self.init_model(model_number)
try:
if key == ‘ATOM’:
self.models[model_number].pdb_atoms.append(line[0:-1])
else:
self.pdb_records[key].append(line[0:-1]) # remove trailing end of line
except KeyError:
assert( key != ‘ATOM’ )
self.pdb_records[key] = [line[0:-1]]
in_file.close()
def find_chains(self):
# if ‘COMPND’ in self.pdb_records:
# l = ”
# for cl in self.pdb_records[‘COMPND’]:
# l += cl[10:]
# specs = [s.strip() for s in l.split(‘;’)]
# for spec in specs:
# if spec[0:6] != ‘CHAIN:’:
# continue
# self.chains = self.chains + [a.strip() for a in spec[6:].split(‘,’)]
# else: # we have a bad PDB file, so we parse the ATOMs
for model in self.models.values():
chain_set = set()
for ar in model.pdb_atoms:
chain_set.add(ar[21])
chain_list = list(chain_set)
chain_list.sort()
for ch in chain_list:
chain = Bunch()
chain.name = ch
chain.modelnum = model.num
chain.residues = {}
chain.selected_residues = []
model.chains[ch] = chain
def number_of_models(self):
if ‘NUMMDL’ in self.pdb_records:
return int(self.pdb_records[‘NUMMDL’][0][6:])
else:
return len(self.models)
def setup_residue_data_for_chains(self):
# if ‘SEQRES’ in self.pdb_records:
# seqres = {}
# for c in self.chains:
# seqres[c] = []
# for subseq in self.pdb_records[‘SEQRES’]:
# c = subseq[11]
# seqres[c] = seqres[c] + subseq[19:].strip().split(‘ ‘)
# for c in self.chains:
# chain_residues = self.chain_data[c][‘RESIDUES’]
# seqres[c] = [res for res in seqres[c] if res != ”]
# for n,r in zip(range(1, len(seqres[c])), seqres[c]):
# chain_residues[n] = r
# else: # we have a bad PDB file : we parse the ATOM records
for model in self.models.values():
for ar in model.pdb_atoms:
ressn = int(ar[22:26]) # the residue number
model.chains[ar[21]].residues[ressn] = ar[17:20].strip()
# – – – – – – – – – – – – – – – – – – – – – – – – – – – – – – – – – – – – – – –
# M I C R O M E G A S C O N T R O L L E R
# – – – – – – – – – – – – – – – – – – – – – – – – – – – – – – – – – – – – – – –
class MicroMegasController:
“This class controls the UI window for the LifeExplorer plugin”
def __init__(self):
self.friend = gel.create(“MicroMegasController”)
self.bio_systems = {}
def load_file_from_graphite(self, fname):
if not ( fname.endswith(‘.pdb’) or fname.endswith(‘.pdb1’) ):
return
self.load_file(fname, false)
def load_file(self, fname, call_graphite_load = True):
try:
bs = BioSystem(fname)
if not ( bs.name in self.bio_systems ):
self.bio_systems[bs.name] = bs
MMW_pdb_list.item(bs.name)
if call_graphite_load:
scene_graph.load_objects(fname)
for model in bs.models.values():
for chain in model.chains.values():
path = bs.name + ‘.’ + str(model.num) + ‘.’ + chain.name
MMW_distance_chain_list_1.item(path)
MMW_distance_chain_list_2.item(path)
except Exception as inst:
print(inst)
print(“An error occured while loading the file ” + fname)
def write_file(self, fname):
(bs, model, chain) = self.get_selection()
if bs == False:
return
self.friend.write_pdb(bs.name, bs.filename, fname)
self.message(“The file ” + fname + ” has been written”)
def get_selection(self):
pdb_name = MMW_pdb_list.value
if pdb_name not in self.bio_systems:
return (False, False, False)
bs = self.bio_systems[pdb_name]
mnum = 0
try:
mnum = int(MMW_pdb_model_list.value)
except:
return (bs, False, False)
if mnum not in bs.models:
return (bs, False, False)
model = bs.models[mnum]
chain_name = MMW_pdb_chain_list.value
if chain_name not in model.chains:
return (bs, model, False)
chain = model.chains[chain_name]
return (bs, model, chain)
def delete_chains_of_pdb_in_list(self, pdbname, li):
liv = [l.strip() for l in li.values.split(‘;’)]
for val in liv:
if val.strip().split(‘.’)[0] == pdbname:
li.value = val
li.remove_selected_item()
def trash_selected_pdb(self, remove_from_graphite = True):
name = MMW_pdb_list.value
if name in self.bio_systems:
bs = self.bio_systems[name]
# delete chain list in the GUI’s distance NoteBookPage
self.delete_chains_of_pdb_in_list(name, MMW_distance_chain_list_1)
self.delete_chains_of_pdb_in_list(name, MMW_distance_chain_list_2)
MMW_distance_chain_1.caption=”
MMW_distance_chain_2.caption=”
# FIXME : remove all distance pairs involving the deleted PDB
# delete PDB
del self.bio_systems[name]
MMW_pdb_list.remove_selected_item()
self.pdb_selected(MMW_pdb_list.value)
if remove_from_graphite:
scene_graph.current_object = name
scene_graph.delete_current_object()
self.friend.delete_pdb(name)
def grob_selected(self, oname):
if oname in self.bio_systems:
MMW_pdb_list.value = oname
def trash_named_pdb(self, objects_in_scene_graph):
“””We don’t know the name of the item that has been deleted in the scene graph
so we check manually which one has disappeared”””
graphite_items = [i.strip() for i in objects_in_scene_graph.split(‘;’)]
#graphite_items = [i.strip() for i in scene_graph.values.split(‘;’)]
my_pdb = ”
for name in self.bio_systems:
if not name in graphite_items:
my_pdb = name
if my_pdb != ”:
MMW_pdb_list.value = my_pdb
self.trash_selected_pdb(False)
def message(self, m):
MMW_message.value = m
def pdb_selected(self, pdbname):
self.message(“”)
MMW_number_of_residues.caption = ‘No residue’
MMW_pdb_model_list.values = ”
MMW_pdb_chain_list.values = ”
MMW_pdb_selected_residues.values = ”
if pdbname in self.bio_systems:
self.message(“Selected PDB ” + pdbname)
mods = sorted(self.bio_systems[pdbname].models)
for m in mods:
MMW_pdb_model_list.item(str(m))
def model_selected(self, model_num):
MMW_number_of_residues.caption = “No residue”
MMW_pdb_chain_list.values = ”
MMW_pdb_selected_residues.values = ”
(bs, model, chain) = self.get_selection()
if bs == False: return
self.message(“”)
if model == False: return
self.message(“Selected model ” + model_num + ” of PDB ” + bs.name)
chns = sorted(model.chains)
for ch in chns:
MMW_pdb_chain_list.item(ch)
def chain_residues_interval(self, cd):
K = sorted(cd)
left = K[0]
right = K[0]
output = []
for k in K:
if k > right + 1:
output.append((left,right))
left = k
right = k
output.append((left,right))
return output
def chain_selected(self, chain_name):
MMW_pdb_selected_residues.values = ”
MMW_number_of_residues.caption = “No residue”
(bs, model, chain) = self.get_selection()
if chain == False: return
self.message(str(len(chain.residues)) + ” residues”)
# display the residues intervals at the bottom of the window
temp = ‘Defined residues: ‘
for l,r in self.chain_residues_interval(chain.residues):
temp += ‘[‘+str(l)+’,’+str(r)+’] ‘
MMW_number_of_residues.caption = temp
# display the selected residues
n = 0
for r in chain.selected_residues:
left, right, color = r
label = ‘sel’
if left == right:
label += str(n) + ‘: ‘ + str(left) + ‘ (‘ + str(chain.residues[left]) + ‘)’
else:
label += str(n) + ‘: From ‘ + str(left) + ‘ to ‘ + str(right)
label += ‘ (‘ + str(chain.residues[left]) + ‘ to ‘ + str(chain.residues[right]) + ‘)’
MMW_pdb_selected_residues.item_color(label, color)
n = n + 1
def selected_residue_clicked(self, sel):
(bs, model, chain) = self.get_selection()
if (sel == ”) or (chain == False): return
try:
toks = sel.split(‘ ‘)
MMW_residues_to_select.value = toks[2]+’:’+toks[4]
except Exception as inst:
print(inst)
def remove_selected_residues(self):
(bs, model, chain) = self.get_selection()
if chain == False: return
sel = MMW_pdb_selected_residues.value
try:
n = int(sel.split(‘:’)[0][3:])
chain.selected_residues.pop(n)
self.chain_selected(chain.name)
except Exception as inst:
print(inst)
def select_residues(self, string):
(bs, model, chain) = self.get_selection()
if chain == False: return
# OK we have a chain that is selected
try:
ranges = string.strip().split(‘,’)
for r in ranges:
bounds = r.strip().split(‘:’)
left = -1
right = -1
if len(bounds) == 1:
left = right = int(bounds[0])
elif len(bounds) == 2:
left = int(bounds[0])
right = int(bounds[1])
else:
raise Exception(“There are too many numbers”)
if left > right:
raise Exception(“The left residue number is larger than the right one”)
residues = chain.residues
for resn in range(left, right+1):
if resn not in residues:
raise Exception(“A selected residue does not exist”)
chain.selected_residues.append((left,right,\
MMW_select_residues_color_button.color))
self.chain_selected(chain.name)
MMW_residues_to_select.value = “”
MMW_new_selected_residues.value = “”
except Exception as inst:
print(inst)
def show_window(self):
MMW_window.show()
def base_color_helper(self, new_color):
rgb = new_color.strip().split(‘ ‘)
comps = ‘#’+”.join([hex(int(float(rgb[i])*255.0))[2:].rjust(2,’0’) for i in range(3)])
MMW_base_surface_color_button.color = comps
MMW_base_surface_color_button.clearFocus()
def color_helper(self, new_color):
rgb = new_color.strip().split(‘ ‘)
comps = ‘#’+”.join([hex(int(float(rgb[i])*255.0))[2:].rjust(2,’0’) for i in range(3)])
MMW_select_residues_color_button.color = comps
MMW_select_residues_color_button.clearFocus()
def css_color_to_ascii_triple(self, cssc):
r = int(‘0x’+cssc[1:3],16)
g = int(‘0x’+cssc[3:5],16)
b = int(‘0x’+cssc[5:7],16)
return str(r)+’ ‘+str(g)+’ ‘+str(b);
def dump_field(self):
(bs, model, chain) = self.get_selection()
if chain == False: return
if chain == False:
self.message(“I can’t dump the field: please select a chain first.”)
return
self.message(“Computing gaussian field and dumping in to disk. Please be patient…”)
# OK we have a chain that is selected
p = 0.0;
try:
p = float(MMW_surface_p.value)
except Exception as inst:
MMW_surface_p.value = “0.5”
p = 0.5;
s = str(p) + ‘;’ + bs.filename + ‘;’ + chain.name
self.friend.dump_field(pdb.name, s)
self.message(“The gaussian field has been dumped to disk.”)
def make_chain_mesh_parameter(self, chain): # unused argument
s = str(chain.modelnum) + ‘@’ + chain.name
for (left, right, color) in chain.selected_residues:
s += ‘@’ + str(left) + ‘@’ + str(right) + ‘@’ + self.css_color_to_ascii_triple(color)
return s
def make_one_surface(self, bs, model, chain):
micromegas_cgal.setBlend(MMW_blend_chains_button.value)
micromegas_cgal.setRemesh(MMW_remesh_check_button.value)
micromegas_cgal.setCreateResidueMap(MMW_create_residue_map_button.value)
# surface’s precision parameter
prec = 0.0;
try:
prec = float(MMW_surface_p.value)
except Exception as inst:
prec = 0.5;
if( prec > 3.0 ): prec = 3.0
if( prec < 0.01 ): prec = 0.01
MMW_surface_p.value = str(prec);
micromegas_cgal.setPrecision(prec);
# the distance_bound parameter
distance_bound = 0.0
try:
distance_bound = float(MMW_parameter_mesher_distance_bound.value)
except:
distance_bound = 0.15
distance_bound = min(distance_bound, 1.00)
distance_bound = max(distance_bound, 0.01)
MMW_parameter_mesher_distance_bound.value = str(distance_bound)
micromegas_cgal.setDistanceBound(distance_bound);
# find out what we should mesh
models_to_mesh = []
chains_to_mesh = []
grobname = bs.name
if model == False:
models_to_mesh = bs.models.values()
else:
grobname += ‘.’+str(model.num)
models_to_mesh.append(model)
for m in models_to_mesh:
if chain == False:
chains_to_mesh.extend(m.chains.values())
else:
grobname += ‘.’+chain.name
chains_to_mesh.append(chain)
grobname_with_base_color = grobname + ‘;’ \
+ self.css_color_to_ascii_triple(MMW_base_surface_color_button.color)
first = True
self.message(“Creating surface. Please be patient…\n”)
chain_parameter = “”
for c in chains_to_mesh:
if not first:
chain_parameter += ‘;’
first = False
chain_parameter += self.make_chain_mesh_parameter(c)
self.friend.make_surface(bs.filename, grobname_with_base_color, chain_parameter)
self.message(“The surface mm_”+grobname+” has been created.\n”)
def make_surface(self):
(bs, model, chain) = self.get_selection()
if bs == False:
return
group = MMW_surface_group_button.value
if group:
self.make_one_surface(bs, model, chain)
elif model == False:
for m in bs.models.values():
for c in m.chains.values():
self.make_one_surface(bs, m, c)
elif chain == False:
for c in model.chains.values():
self.make_one_surface(bs, model, c)
else:
self.make_one_surface(bs, model, chain)
MMW_remesh_check_button.value = False
MMW_create_residue_map_button.value = False
def remove_distance_pair(self):
field = MMW_distance_pair_distance_list.value
MMW_distance_pair_distance_list.remove_selected_item()
if field == ”:
return
fields = field.split(‘ ‘)
self.friend.remove_residue_pair(fields[0], fields[2])
def clicked_add_distance_pair(self):
nop = ‘OK’
if (MMW_distance_chain_list_1.value == ”) or \
(MMW_distance_chain_list_2.value == ”): nop = ‘BAD_CHAIN’
res1 = 0
res2 = 0
try:
res1 = int(MMW_distance_residue_1.value)
res2 = int(MMW_distance_residue_2.value)
except Exception:
nop = ‘BAD_RES’
if nop == ‘BAD_RES’:
self.message(“I can’t convert residue value to numbers.”)
return
if nop == ‘BAD_CHAIN’:
self.message(“I don’t have all the data to form a residue pair. Please try again.”)
return
# check if the residues do exist
selection1 = MMW_distance_chain_list_1.value.split(‘.’)
selection2 = MMW_distance_chain_list_2.value.split(‘.’)
selection1.append(res1)
selection2.append(res2)
self.add_distance_pair((selection1,selection2))
def add_distance_pair(self,selection):
pdb_1 = selection[0][0]
pdb_2 = selection[1][0]
model_1 = int(selection[0][1])
model_2 = int(selection[1][1])
chain_1 = selection[0][2]
chain_2 = selection[1][2]
res1 = selection[0][3]
res2 = selection[1][3]
if (not pdb_1 in self.bio_systems) or (not pdb_2 in self.bio_systems):
self.message(“An error happened (PDB not found).”)
return
bs1 = self.bio_systems[pdb_1]
bs2 = self.bio_systems[pdb_2]
if (not model_1 in bs1.models) or (not model_2 in bs2.models):
self.message(“An error happened (model not found).”)
return
model_1 = bs1.models[model_1]
model_2 = bs2.models[model_2]
if (not chain_1 in model_1.chains) or (not chain_2 in model_2.chains):
self.message(“An error happened (chain not found).”)
return
# OK we have a chain that is selected
residues1 = model_1.chains[chain_1].residues
residues2 = model_2.chains[chain_2].residues
if (res1 not in residues1) or (res2 not in residues2):
self.message(“At least one residue does not exists.”)
return
s1 = pdb_1+’.’+str(model_1.num)+’.’+chain_1+’.’+str(res1)
s2 = pdb_2+’.’+str(model_2.num)+’.’+chain_2+’.’+str(res2)
self.friend.insert_residue_pair(s1, s2, bs1.filename, bs2.filename)
MMW_distance_pair_distance_list.item(s1+’ <—> ‘+s2)
self.message(“The pair of residues has been added.”)
def recompute_distances(self):
MMW_distance_pair_distance_list.values = ”
for d in self.friend.compute_pair_distances().split(‘@’):
MMW_distance_pair_distance_list.item(d)
def load_ui(self):
gel.load_gml_file(“plugins/OGF/MicroMegas/micromegas.gml”)
# set the compilation date
MM_compile_date.caption = “Compiled on “+self.friend.compile_date();
# choose an initial color
MMW_select_residues_color_button.color = ‘#dbf965’
MMW_base_surface_color_button.color = ‘#999999’
gel.connect(gel.create(classname=”MenuItem”, parent = menu_windows,
caption=”Show LifeExplorer window”).clicked, micromegas_controller.show_window)
gel.connect(scene_graph.values_changed, micromegas_controller.trash_named_pdb)
gel.connect(object_list.value_changed, micromegas_controller.grob_selected)
gel.connect(load_dlg.value_changed, micromegas_controller.load_file_from_graphite)
gel.connect(MMW_load_dlg.value_changed, micromegas_controller.load_file)
gel.connect(MMW_write_dlg.value_changed, micromegas_controller.write_file)
gel.connect(MMW_pdb_list.value_changed, micromegas_controller.pdb_selected)
gel.connect(MMW_pdb_model_list.value_changed, micromegas_controller.model_selected)
gel.connect(MMW_pdb_chain_list.value_changed, micromegas_controller.chain_selected)
gel.connect(MMW_delete_pdb_button.clicked, micromegas_controller.trash_selected_pdb)
gel.connect(MMW_new_selected_residues.value_changed, micromegas_controller.select_residues)
gel.connect(MMW_delete_select_residues_button.clicked, micromegas_controller.remove_selected_residues)
gel.connect(MMW_pdb_selected_residues.value_changed, micromegas_controller.selected_residue_clicked)
gel.connect(MMW_color_dlg.value_changed, micromegas_controller.color_helper)
gel.connect(MMW_base_color_dlg.value_changed, micromegas_controller.base_color_helper)
gel.connect(MMW_make_surface_button.clicked, micromegas_controller.make_surface)
# gel.connect(MMW_dump_field_button.clicked, micromegas_controller.dump_field)
gel.connect(MMW_distance_recompute_distances_button.clicked,
micromegas_controller.recompute_distances)
gel.connect(MMW_distance_add_pair_button.clicked, micromegas_controller.clicked_add_distance_pair)
gel.connect(MMW_distance_remove_selected_pair_button.clicked,
micromegas_controller.remove_distance_pair)
micromegas_cgal = gel.create(“MicroMegasCgal”)
gel.bind(“micromegas_cgal”, micromegas_cgal) ;
micromegas_controller = MicroMegasController()
micromegas_controller.load_ui()
micromegas_controller.show_window()